- Help Center
- I am an App User
- 📖 Mobile App | Android & iOS
-
I am an Event Organizer
- 📖 Getting Access
- 📖 Event Details
- 📖 Customization
- 📖 Ticketing
- 📖 Matchmaking
- 📖 Sponsors
- 📖 Schedule & Widget
- 📖 Attendees & Groups
- 📖 Event Onboarding
- 📖 Speakers
- 📖 Streams
- 📖 Breakout Rooms
- 📖 Event Info Pages
- 📖 Communications
- 📖 Home Analytics
- 📖 Exporting Reports
- 📖 Analytics Tab Overview
- 📖 Traffic Analytics
- 📖 Integrations
- 📖 Best Practices
- 📖 Troubleshooting
-
I am a Sponsor
-
I am an App User
-
I am a Web App User
-
Integrations
-
Brella Partners
-
Brella Dictionary
Mobile App: Select time zone
Learn how to select the right time zone in the Brella mobile app.
To be covered:
Intro
You can check your time zone from your account and at the top of the 'Schedule' tab during the event.
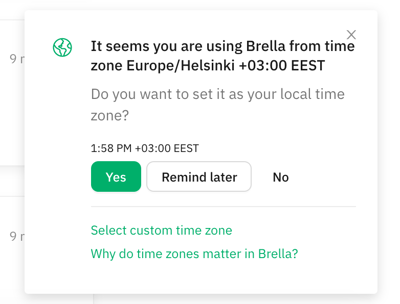

When you want to change your time zone after the join process, please follow the steps below.
How to Select the time zone
1. Tap your profile in the top left corner of the app
2. Scroll down until you reach the time zone settings. Change the format and time zone from the drop-down menu.
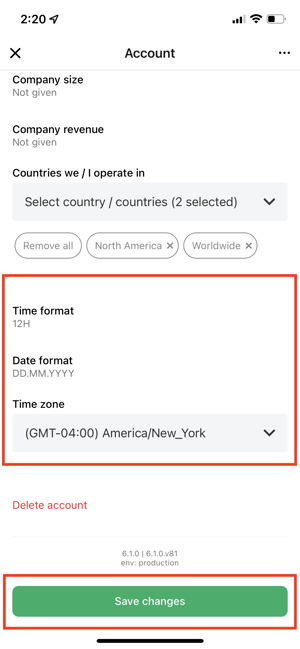
3. Tap the green 'Save changes button when you're all done.
💡 Choose your timezone based on the city you are located in, so you don't have to worry about daylight savings, as those will be updated on the account accordingly.
Last updated in July 2023.
Written by Rajinda Wijetunge.

If you didn't find an answer to your questions, please get in touch with the Support Team here.
👇