Learn how to customize the sponsor widget styling through CSS
To be covered:
Intro
The sponsor widget function shows all of the sponsors who are available in any event. This can be customized according to the event organizer's requirements by applying a CSS style function and then used to embed the sponsors of your event on the event website.
Get started with the sponsor widget
-
First, ensure you have activated Brella’s "sponsors" feature.
- Navigate to your event's Admin Panel and go to the 'Sponsors' tab.
- Activate the Sponsors feature.
- Add sponsor categories and booths (test / mock sponsors are fine!). This will allow you to see the widget update as you customize and style it.
-
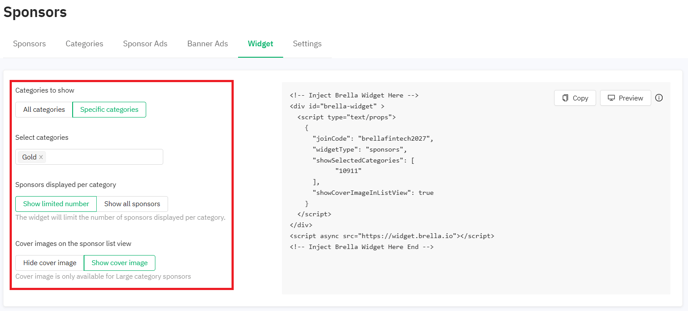
Once the "Sponsors" feature is active, click on the "Widget" button. Click on 'copy' to extract the code and paste it to the website.
👉The copied code will look like this (the only difference will be the "join code", which will be your event's URL slug). You can preview the widget's look by clicking on the 'preview' option.
<div id="brella-widget">
  <script type="text/props">
  {
    "joinCode": "YOUREVENTJOINCODE",
    "widgetType": "sponsors",
    }
  </script>
</div>
<script async src="https://widget.brella.io">
</script>
<!-- Inject Brella Widget Here End  -->
-
You can add this code to a page on your website and the sponsor widget will be visible to visitors. Any updates to your sponsors' list in Brella will automatically be reflected in the sponsors' widget.
Customizations available
You can customize the way the Brella sponsor widget looks on your webpage by choosing your preferences on the admin panel.
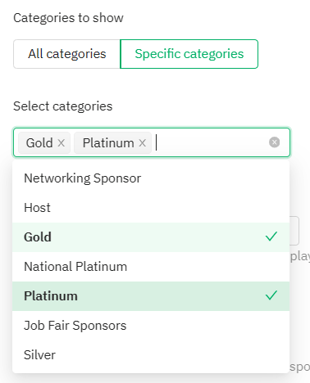
- Sponsors (categories) displayed per widget
This customization option gives you the ability to decide whether you want to display the booths attached to all the categories you have added on the admin panel or select only specific categories to be highlighted on the website.
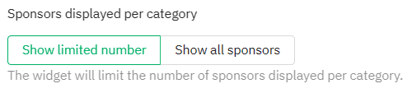
- Sponsors displayed per category
This customization option gives you the ability to select whether you want to show all the sponsor booths in a category or a limited number of sponsors for a category. The widget will limit the number of sponsors displayed per category if you select the 'show limited number'. There will be a 'show all' button added if you decide to opt for the 'show limited number' customization where the viewers can click to see all the sponsors in the category.
- Cover images on the widget
This customization allows you to select whether you want to display the cover images of any sponsors who are in a large category or show only the logo without the cover image.

The CSS code on the right-hand side box of the sponsor widget tab will get automatically edited based on your selections made on the left-hand side customizations. You are not required to edit the CSS code manually. You can always click on the 'preview' option to get an idea of how the customizations you select will show once the widget is embedded on your website.
- Props to allow to show the full sponsor names
Sometimes too long names of sponsors may get cut on the website. With this prop you will be able to force all the sponsor cards to show the sponsor name in full.
<style>
.brella-widget-sponsor-category-sponsor-name {
       -webkit-line-clamp: initial !important;
  }
</style>
- Customize the colors of category heading, sponsor heading and the "Learn more" button
The widget normally takes the default CSS colors available on your website for the category and sponsor heading. For the "Lean more" button it normally uses the color provided by Brella. You can however customize all of those with the following props.
- Category heading change:
.brella-widget-root h2 {
    color: yellow !important;
  }
.brella-widget-root h3 {
    color: blue !important;
  }
.brella-widget-sponsor-category-sponsor-learn-more-link {
    color: red !important;
  }
.brella-widget-root h2, .brella-widget-root h3, .brella-widget-sponsor-category-sponsor-learn-more-link {
    color: yellow !important;
  }
- Customize the size of the logos for the categories (in pixels)
<!-- Inject Brella Widget Here -->
<div id="brella-widget" >
  <script type="text/props">
    {
      "joinCode": "BrellaInfinite20",
      "widgetType": "sponsors",
      "sponsorLogoSize": {
          "large": 195,
          "medium": 100,
          "small": 75
        }
    }
  </script>
</div>
<script async src="https://widget.brella.io"></script>
<!-- Inject Brella Widget Here End -->
- If you want to to style or remove the count element next to the category name
<style>
.brella-widget-sponsor-category-header-count {
  color: tomato;
}
</style>
Last updated - April 2024

Written by Nikita Salnikov
If you didn't find an answer to your questions, please get in touch with the Support Team here