Learn how to create and generate join codes for new invites by importing a .CSV file
To be covered
- Intro
- Creating invites for the first time
- Generate new invites (after the first upload)
- Updating existing invites
- Avoid duplicates
- Resolving errors!
Intro
When importing new invites to Brella or updating them through a CSV. file, it's crucial that you follow the steps below to avoid mistakes or duplicates.
We highly recommend using Google Sheets or Open Office when creating CSV. files to import/export invites data.
Make sure that none of the fields in the CSV file include commas within the attendee information fields. For example, change the attendee's title from "Customer Success Manager, EMEA" to "Customer Success Manager - EMEA."
Creating Invites For The First Time
- Navigate to the Admin Panel ➡️ People ➡️ Invites
- Export the invites template file from the Admin Panel in the People tab - Invites sub-tab by choosing "Export Invites (csv.)".

- You'll find a template to be filled in with invite information. Start adding the new invites to the list by filling in the following columns only (do not add any information besides the following):
- ❗Email (Mandatory)
- First name (Optional, up to you)
- Last name (Optional, up to you)
- Company (Optional, up to you)
- Title (Optional, up to you)
- ❗Seats (Mandatory): indicate how many seats the registrant can have. It should have at least 1 (one).
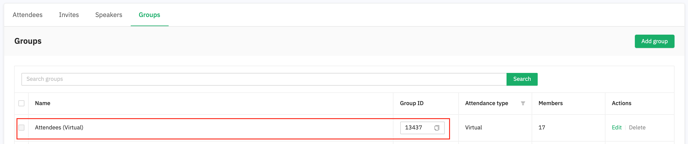
- ❗Group_id (Mandatory): indicate what type of attendance and what group this registrant belongs to. 👍 Copy the Group ID from Groups by clicking on the two pages and add it to the Group_id column.

- Once you have the new registrants in the file, as shown in the image above. Export the file (or save as) in .csv format.
- Then, go to the admin panel and upload the CSV file for your event by clicking on Invites import.csv.

- Now you can mail the newly generated unique join codes and URLs to the new registrants by associating the unique join URLs to the registrant. NOTE: Brella does not send the join codes and URLs to attendees if you don't have Publish Invites enabled. Otherwise, this must be done through your mailing software provider.
- If you need to send the invites through email software, export the list of invites generated (click the button Invites export.csv from the Admin Panel), and import it to your email software to finally send it to the registrants.
⭐ Tip! When creating new join codes, the CSV file will usually display them at the bottom of the list. So make sure to have the first and last names of the new list so you can find them easily.
Note! In the .csv file, there is a column named qr_string that is created for every unique join code generated once you export the attendee list. With these, you can create QR codes for attendees' badges. Read more here.

Generating New Invites (after the first upload)
- Navigate to the Admin Panel ➡️ People ➡️ Invites
- Export the existing invites data file from the Admin Panel in the People tab - Invites sub-tab by choosing "Invites export (csv.)".
- DELETE ALL THE EXISTING INVITES BUT LEAVE THE TITLES ONLY so that you can add the new list of attendees.
- Start adding the new invites to the list by filling in the following columns only (do not add any information besides the following):
- ❗Email (Mandatory)
- ❗Seats (Mandatory): indicate how many seats the registrant can have.
- ❗Group_id (Mandatory): indicate what type of attendance and what group this registrant belongs to. 👍 Copy the Group ID from Groups by clicking on the two pages and add it to the Group_id column.

- Once you have the new registrants in the file, as shown in the image above. Export the file (or save as) in .csv format.
- Then, go to the admin panel and upload the CSV file for your event by clicking on "Invites import.csv."
- Now you can mail the newly generated unique join codes and URLs to the new registrants by associating the unique join URLs to the registrant. NOTE: Brella does not send the join codes and URLs to the attendees if you don't have Publish Invites enabled. Otherwise, this must be done through your mailing software provider.
- When you have uploaded the new list, please refresh the page, export the list of invites (click the button Invites export.csv from the Admin Panel), and import it to your email software to finally send it to the registrants.
Updating Existing Invites
- Go to the Admin Panel ➡️ People ➡️ Invites
- Export the existing invites data file from the Admin Panel in the PEOPLE tab - INVITES sub-tab by choosing "Invites export (csv.)".
- Open the file in Google Sheets or Open Office and
- ❗DO NOT EDIT/CHANGE: ID, JOIN LINK, OR JOIN CODE.
- Update the details as required of existing invites
Once ready, export the file (or save as) in .csv format and upload the CSV file in the Brella admin panel for your event by clicking on Invites import.csv. ❗ DON'T IMPORT THE CSV FILE FROM YOUR CRM OR CONVERTER SOFTWARE; USE THE EXPORTED CSV FILE FROM BRELLA. - When you have uploaded the new list, refresh the page. ❗
- Then export the list of new invites (the button called "Invites export.csv" from the Admin Panel in the PEOPLE tab - INVITES sub-tab next to "Invites import.csv"). The new list will contain the newly generated join codes and URLs. The new list is usually at the bottom of the file, so remember the first and last names of the previous attendees.
- You can then mail the newly generated unique join URLs to the new registrants by associating the unique join URLs with the registrant. NOTE: Brella does not send the join URLs to the attendees. This must be done through your mailing software provided.
Avoid duplicates
❗ Duplicates might happen when you add all the registrants again to a CSV upload without using the Brella IDs (column A) generated and found from the CSV export of (existing) invites OR by adding the CSV file from your CRM or other csv converter software.
- To update invites in Brella, export the CSV file from the admin panel, delete all existing invites, or update the necessary invites without changing the Join code or the join code/link. Otherwise, you will create duplicates.

- To avoid creating duplicates, if you need to generate new unique join codes for new attendees, you can upload a new invite list by following the steps on the Updating existing invites OR
- Do not add the same existing registrants on the list with a Brella ID in the CSV file.
- If you need to update a registrant's details or seats, you can also do it on the admin panel without exporting the file.
Resolving issues 🔎
If you have any issues with the .csv file, please read on:
Invites are missing information!
- For example, I assigned one seat to all invites, but they were imported as 0. This happens when there's a typo in the titles. In this case, usually, it happens because the title 'seats' had a typo; it was written as 'seat.'

If the CSV file shows errors, double-check the following:
- When saving a spreadsheet in Excel as a CSV file, it may separate the values with semi-colons ( ; ) instead of commas (,). Brella only recognizes comma-separated (,) CSV files, so if you import a CSV that separates the values with a semi-colon, you will not see the number of assigned seats. Unfortunately, as this is an Excel issue that can't be changed, we strongly recommend using Google Sheets or OpenOffice, with which you can choose what the separator (comma instead of the semi-colon) is.
- CSV files saved with semi-colons will not be uploaded and will receive this error. To change semicolons to commas, see point 4.

- If you exchange lists with colleagues located in different countries, we highly recommend using Google Sheets or Open Office to import/export, as some countries use (.) instead of (,).
- Ensure none of the CSV file fields include commas or other signs within the attendee information! If an attendee's title is "Customer Success Manager, EMEA," these attendees will not be imported nor generate join codes for them. Change the attendee's title from "Customer Success Manager, EMEA" to "Customer Success Manager - EMEA" to import to work optimally.
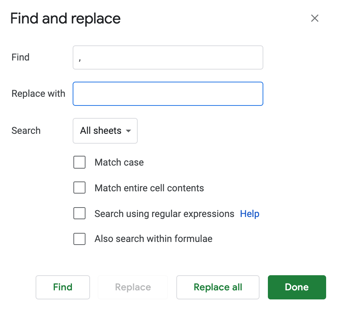
- Make sure your attendee information does not contain commas. Since the CSV file separates the different fields with commas, commas can cause errors. Before uploading the CSV file to Brella, double-check if you have commas (,) within your attendee information fields. It can be done in Google Sheets by going to Edit > Find and replace > then replace the "," (commas) with a "_" (space).
- If you cannot use any of the software mentioned above, there is another workaround! 👍
- Open the CSV file in Text Editor. Check text edit to ensure that there are no semi-colons by clicking right-click > Open with Text Edit. App> then Ctrl/Cm+F > then click Replace, like in the image below, and import this list again to Brella. If there are semi-colons instead of commas, replace them.

- Open the CSV file in Text Editor. Check text edit to ensure that there are no semi-colons by clicking right-click > Open with Text Edit. App> then Ctrl/Cm+F > then click Replace, like in the image below, and import this list again to Brella. If there are semi-colons instead of commas, replace them.
Last updated - July 2023
Written by Yusra Mohideen

If you didn't find an answer to your questions, please get in touch with the Support Team here.
👇