Learn how to upload an event agenda through import/export of a CSV file
To be covered
Intro
We understand that setting up your event agenda can be time-consuming when you have to add them individually to the app. As event organizers already have a sketch of their agenda on a Word or Excel document, Brella supports uploading the agenda. With a little tweak to update these existing agendas to the supported format, event organizers can quickly and easily upload the whole agenda through a CSV file.
Import your event agenda
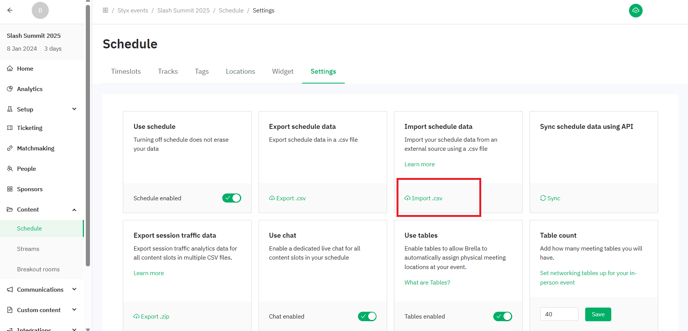
1. Download the template from the Admin Panel by going to Settings > click on Export under 'Export schedule data,' and open the file in Google Sheets or Excel.

❗If you use Excel, ensure you have the file separated by commas (,) and not by semicolons (;). You can check this step at the end with TextEditor.
2. To successfully import the schedule, format the table as shown below. 👇

- Id and external_id: Leave these columns empty, as they are needed for technical purposes only.
- Start_time: Add the date as "yyyy-mm-dd" and time "hh:mm:ss". This will be the start date and time of your time slot, whether it's a meeting slot or a content slot. Ensure that the date(s) of the timeslots match the date(s) of your event in the Admin Panel.
- Duration: The duration of the timeslot in minutes.
- Reservable: Put "FALSE" or "TRUE" to determine meeting slots and content slots. Write FALSE for content slots and TRUE for meeting slots.
❗Note that you should enter "FALSE" or "TRUE" without any additional spaces before or after the word. Otherwise, it will automatically be considered as a networking slot when uploading.
- Title: write the title of your content slots. Note that meeting slots don't have any titles. The maximum character limit is 100.
- Subtitle: write the subtitle of your content slots. Note that meeting slots don't have any subtitles. The maximum character limit is 100.
- Location: write the location you want to add to your content slots. Note that you can only add one location. Example: Main Stage.
- Content: write what your content slots will be about.
- Tags: write all the tags you want to add to your content slots. You can add as many tags as you like. Use a semicolon ";" to separate multiple tags. If you're creating a multitrack agenda, you can tag sessions as Track A, Track B, and so on, then rename them in the editor if you wish.
- Track id: Add the track id of the track you want the session to be created in. The tracks will have to be created prior to importing the CSV so you can add the track id details on the CSV.

💡
- If the track ID field is left empty for content slots, it will link the sessions created to the default track for content slots 'Event sessions'.
- You can leave the track ID empty for the new networking slots created since the networking slots will anyway be linked to the default track '1:1 meetings'.
3. Save the file as a comma-separated (.csv)
4. To upload it to your event.
Navigate to the admin panel - Schedule > Settings > click on 'Import csv.'
Your schedule will be uploaded to the platform! Tags, locations, and timeslots you created in the .csv file will also be added to your event.
Export your event agenda
Navigate to the admin panel - schedule - settings - click on "Export .csv"
You will get an email with the exported list to the registered email.

Checklist before importing your schedule
There are some common errors we found when importing a schedule to Brella - Let's review!
- Double-check that you have all the information correct. Do not import it again without carefully checking what went wrong, as you will create duplicates. In the image below, we give you some potential reasons why the file couldn't be imported successfully.

- Ensure the "id" and "external_id" columns are empty if this is your first upload for the event. ❗If you are editing the file only, do not remove the codes!
- Check the dates match with the event's date in the admin panel (Schedule tab). The dates should be within the duration of the event.
- The start time format should be "yyyy-mm-dd" and time "hh:mm:ss". If it is not like that, Brella will not accept it.
-
🔑TRUE is for networking slots, and FALSE is for content slots. IF you put a FALSE in a networking slot, this networking slot will be created as a content slot and vice-versa.
-
🔑 The content column should contain session descriptions. However, ensure the content column for meeting slots is left empty!
- Make sure the tracks are created BEFORE the upload and the correct track IDs are added on the file.
-
At last, check whether the data was saved correctly in the file. You can do so by opening the .csv file in Text Edit or a similar program and making sure that the information presented here is formatted the same way as in the screenshot below. If needed, make any necessary edits.
In-Text Edit, the file should look like this:

✍️POINTS TO NOTE
- You will not be able to add overlapping sessions for a specific time slot on the same track. Only one slot can be created for any given time period in one track, and a warning will be shown if the timings are overlapping. If you have two sessions at the same time, it is advised to add them in two separate tracks to avoid such overlapping.
Last updated - June 2023.
Written by Nisansala Wijeratne.

If you didn't find an answer to your questions, please get in touch with the Support Team here.
👇