Learn what you can do in the Schedule tab. Start creating your schedule with content and meeting slots divided into different tracks, add a theme and location tag to each slot. Once ready, add your Brella schedule to your website!
The Schedule tab is where to create your event agenda, schedule, or program, as you call it. The creation is very straightforward, and we show you how to make each element step by step.
Remember to check the Schedule widget! It will save you an incredible amount of time when doing last-minute changes.
Content
- Enable Schedule tab
- Create the tracks for your Schedule
- Create your schedule with content and meeting slots
- Add Tags & Locations to your sessions
- Add your Brella Schedule to your website (Widget)
- Schedule Settings
1. Enable Schedule tab
Let's start building your event schedule! For that, we will first need to activate the schedule page for your event.
Go to the admin panel (manager.brella.io), select Schedule from the navigation bar. When prompted to activate the schedule, choose Activate schedule.

👍Tip: If you haven't added any speakers to Brella yet, we recommend returning and adding them before creating your schedule. If not, you can add your speakers when creating each content slot as well.
2. Create the tracks for your Schedule
Before starting to add the content slots for your agenda, plan how you would like to divide the content to be displayed in different tracks. Tracks can be for example named according to the topics or different stages/location you have like the main stage, pitching stage, etc.
You can add a sponsor or show highlighted speakers in the track. Please note that track cannot have overlapping sessions. Learn how to create tracks here.
3. Create your Schedule with content and meeting slots
You have two options to create your event schedule. You can make it manually or in bulk by importing a CSV file.
- Manually - add meeting slots and content slots one by one
- Meeting slots are time slots for networking purposes. These slots will show the networking availability demonstrated by you, the organizers. Learn how to create these here.
- Content slots are slots for the sessions occurring during the event duration. These slots are mainly used to explain what a keynote, workshop, a panel discussion is about. Learn how to create these here.
In a content slot, you can add all the session details, add a sponsor to the session, add an open chat, and integrate digital materials in the sidebar panel to interact with the audience. For instance, you can add Polls or Surveys.
You can add an embedded URL in the Stream field in a content slot to visually present session information. Also, you can integrate visual help as a live stream, presentation, pdf, etc.
- In bulk - add meeting slots and content slots all at once
✋ You can continually update the schedule via the import/export file BEFORE the event starts.
Once you have invited participants to join the event and begin exchanging meeting requests, it's recommended to edit the schedule manually.
Also, avoid deleting unwanted information such as Speakers' assignations, images, and scheduled and pending meetings by the participants.
4. Add Tags & Locations to your sessions
While creating the schedule, ensure to use the theme and location tags to help the participants filter the schedule content in the platform.
These details will also help you guide participants in the right direction when attending a session or discussion, etc.
5. Add your Schedule to your website (Widget)
The Brella widget is a special tool that you can use to display your event schedule from Brella's Admin Panel on your website.
😍 When making updates to the agenda, you will need to do those just once on Brella's Admin Panel (manager.brella.io). All updates will be automatically updated on both the Brella app and your website.
6. Schedule Settings
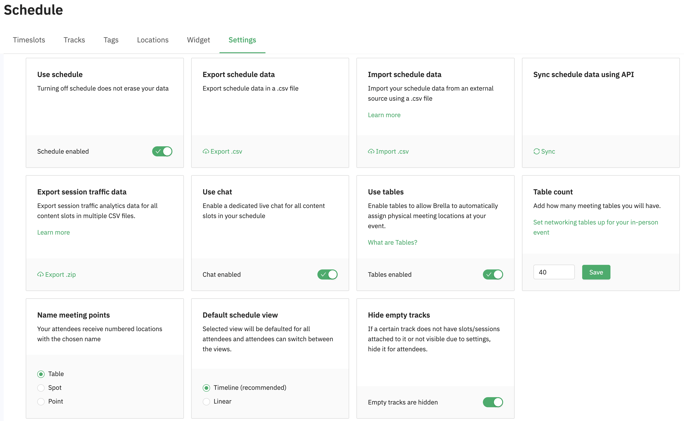
You can find the options to modify the Schedule features under Settings. In this section, you can:
- Enable/disable the Schedule page from your event,
- Export/import the schedule in a CSV file,
- Enable/disable Chat for all content slots (sessions), and
- Enable/disable Tables and manage table settings if tables are enabled (only for in-person & hybrid events).
- Define if your default schedule view is timeline or linear
- Hide empty tracks
You can view a summary of all the schedule settings in this article.
Last updated in June 2023.
Written by Terhi Villi

If you couldn't find an answer to your questions, get in touch with the Support Team here.
👇