Learn all the steps you need to take to host a virtual event.
To be covered:
- Intro
- Possibilities of using Brella for virtual events
- Learn how to set up a virtual event in Brella
- Learn how to enable and create the Matchmaking categories
- Networking at a Virtual event at Brella
- More than just 1:1 networking
- Learn how to start building your event on the platform
- Categorize your audience per group and grant selective access to content and networking
- Brella's Recommended Communications Plan
- Checklists before going live
Intro
Have a clear guide to get started and consider the features you need to use for your event.
In this article, we walk you through the steps on how to build a virtual event in Brella.
Let's go! 🚀
When planning to host a virtual event, Brella will help organizers and your associates in various ways.
Find below what you can do for virtual participants and associated with Brella in a nutshell:
🙋♂️Brella will help you organizers facilitate all associates to find, learn, engage, network, and have an unforgettable experience in one place.
🌐 Brella will help your participants connect through similar interests and goals chosen in the registration process. Every attendee should do it, so the participant volume for connection-making is larger.
🎯 Brella will help sponsors showcase their products and services through a personalized virtual booth. Allowing them to display the representative team to find and share its brand's leadership by connecting with potential leads.
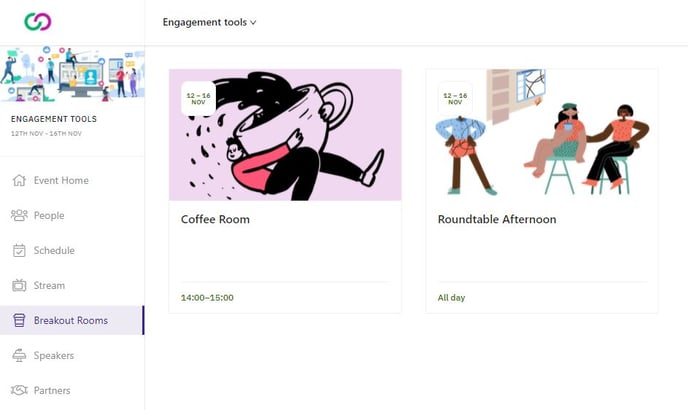
🤝 The way attendees network will be slightly different compared to in-person. We recommend using Tags and Locations to guide the participants on the type of networking and make use of our newest feature for Breakout rooms to have group meetings and sessions.
📺 Additionally, you can offer more visibility and promotion through the Brella Ads that play a big role as a physical banner/publicity in an onsite setting in your sponsorship packages.
👢 Lastly, the most important aspect of planning a virtual event is to put yourself in the participant's shoes to understand what they will go through when using the Brella App to connect through matchmaking. For a virtual event, participants will get to network through the App to find relevant connections.
Having mentioned the highlights of building a virtual event in Brella, now it's time to show you the steps on how to do it first-hand.
Set up a virtual event in Brella
To set up a virtual event, you need to:
- Go to manager.brella.io and log in with your Brella account.
- Open the event and go to the Details tab. For event type, select Virtual event.

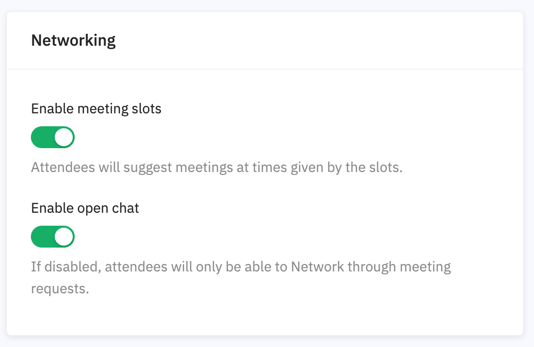
👉For details of networking at a virtual event in Brella. - After selecting your type of event, 👉 Enable meeting slots and open chat. This will allow your attendees to schedule meetings with each other during pre-determined time slots that you have specified in the schedule. For details, go here.
Enable & create the Matchmaking categories
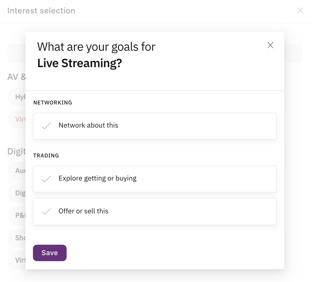
Matchmaking helps participants and associates to find relevant matches at your event. The matchmaking is based on Artificial Intelligence recommendations that help organizers facilitate meaningful connections for participants' common goals at an event. With the intents we have at Brella, you can help participants find:
🔄 People who are looking for what they're offering among all participants.
📈 People who are looking for an investor or vice-versa.
🔎People who are searching for a job or vice-versa.
💡 People who are looking to exchange ideas about a certain topic.
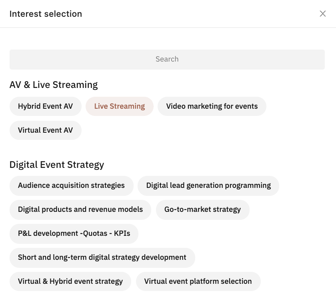
During the registration process, a participant will have to choose multiple matchmaking categories preselected by the organizer. These categories will be based on the event theme, industry, and sponsors' services and products. Participants will get to choose multiple interests, and intents and match with other relevant attendees at your event.
1. Selecting Interests 2. Selecting Intent (Goal) 🎯
It's crucial you enable Matchmaking before inviting participants to the event.
When making these, check this checklist that helps you brainstorm for creating new categories. For creating these, you have two options:
If you are unsure how to move forward the matchmaking, choose one of the 16 templates that fit your industry and come to it later.
🎓 Educate your associates on how to use Matchmaking equally!
- Sponsors
- Speakers
- Participants
- Volunteers
⭐ Find some resources & and materials in the Material Bank.
Networking at a Virtual event at Brella
Participants will attend the event virtually by accessing the platform (Web App). Attendees can participate in group meetings in the Breakout rooms or through the 1:1 Brella video call (max 4 ppl).
Virtual participants can set up all meetings using the Web App and manage their meeting requests quickly.
When using Brella, it's essential to communicate to your audience and associates how the meetings work and how they can make the most of it, taking into account Matchmaking.
Learn how to test the meetings with your team by first configuring your devices for the Brella platform. By doing this, you will put yourself in your associates' shoes and understand what they will have to do to network with one another. 💪 Additionally, a troubleshooting guide to have the right setup before it starts.
Find all details about meetings here: Guide On How to Master the Brella Meetings.
To enable networking at your event, it's crucial you allow:
More than just 1:1 networking
Even if an event occurs in a digital world, it's important to have a dedicated room/s for participants to have casual or topic-related conversations. Our Breakout rooms feature the perfect space to bring small groups (100 ppl/room) to network. Multiple third-party tools can be added to Brella to allow casual group meetings with funny interactive backgrounds/themes.
Start building your event on the platform
Recommended Communications Plan
Just as you need to promote your event to draw attendees continuously, you also need to encourage attendees to join Brella. The best virtual event experience comes from a high number of engaged attendees to provide the best matches possible.
Our data clearly shows that the best time is 2 weeks before the event. During this time, your attendees prepare for your event by viewing the schedule and content, so it's a perfect time to pre-book meetings with relevant people and get acquainted with the platform so they can make the most of it.
Our recommended plan
- Launch emails
- Reminder emails
- Other communications tips
- Networking section on the website
- Blog posts and newsletters
- Social media
- Checklist
Please find the details of our recommended plan here.
Categorize your audience per group and grant selective access to content and networking
Your event is unique, and the ticket structure too. Your event tickets have specific characteristics and give limited access to areas of the event, which makes a part of each attendee experience.
In short, what are Groups? – Groups allow Event Organizers to assign attendees, speakers and sponsors, to a specific group with a defined attendance type and a set of rules such as Stream Access Control and Networking rules.
👉 Categorize your audience when generating unique join codes (invite-only) or by going to the Groups tab in the admin panel. Every attendee who belongs to a group can be given limited access to event content (streams) and networking possibilities.
When hosting a Virtual event, you will have two default groups:
- Attendees group: This is a default group for all participants.
- Sponsors group: This is a default group for all sponsor representatives.
As an organizer, you can create more groups, to segment and understand your audience better. Read more about What are Groups?
Checklists before going live! 🚀
🗝️ Before inviting participants to your event, review your event details and each element on the admin panel.
🗝️ During the event: Do not delete any meeting slot or matchmaking categories.
Last updated in November 2023.
Written by Rajinda Wijetunge.

If you didn’t find an answer to your questions, please contact the Support Team here.
👇