Learn how Matchmaking and Networking work in Communities and how you can make the best of both for your members.
To be covered:
- Intro
- How to enable Matchmaking in your Community
- Instructions for enabling Matchmaking for the first time
- Turn off Matchmaking in your Community
- Edit & reorder Matchmaking interests for your Community
- Networking
Intro
Matchmaking is one of the most important features of an event. It eases the process of finding the best matches for event participants and leads to a better event experience. Brella Matchmaking is based on Artificial Intelligence recommendations. It allows attendees to select detailed interests and intents to make meaningful connections. Matchmaking is the core feature to facilitate pre-determined meetings at your event.
How to enable Matchmaking in your Community
Enabling Matchmaking for your community is easy — and takes just a few minutes. However, it would help if you took some time to design the matchmaking categories and interests before starting the setup. The following Help Center articles can help you get started:
- Best Practices for Matchmaking
- What is Matchmaking at Brella?
- Guide on How to Use Matchmaking Beyond Networking
- Matchmaking Checklist Before Upload
Instructions for enabling Matchmaking for the first time
- Log in to your Brella Admin Panel (manager.brella.io)
- Find and navigate to the Admin Panel for your community.
- Navigate to the Matchmaking tab from the sidebar.
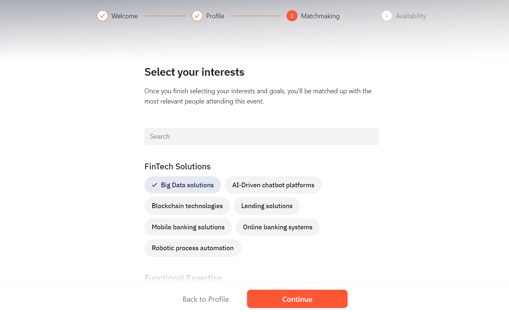
- If the Matchmaking feature hasn't been activated for your event yet, you will be on the first page of Select Interests. Press "Start matchmaking" to enable Matchmaking at your event.
- You can start creating matchmaking categories and interests.
- Note: Brella Communities doesn't yet offer pre-defined matchmaking templates, unlike our events platform.
Turn off Matchmaking in your Community
- Log in to your Brella Admin Panel (manager.brella.io)
- Find and navigate to the Admin Panel for your community.
- Navigate to the Matchmaking tab from the sidebar.
- Click into the Settings sub-tab in the Matchmaking tab.
- Click on the red Remove button and confirm the removal in the pop-up dialogue box.
Edit & reorder Matchmaking interests for your Community
Updating matchmaking interests is a great way to keep your community's networking matches and conversations relevant and exciting.
- Log in to your Brella Admin Panel (manager.brella.io)
- Find and navigate to the Admin Panel for your community.
- Navigate to the Matchmaking tab from the sidebar.
- Drag & drop any category or interest to re-order it.
- The updated order will be reflected in your members' onboarding process and matchmaking interest selection views immediately after saving your changes.
- To add a new interest or category, use the relevant Add Category or Add Interest buttons.
- Click the green Save Changes button when you are done making your edits.
Networking
Networking matches are displayed on the homepage (the recommended matches section) AND the member's page (Your matches tab).
Here are the main differences from regular event networking:
-
- A meeting schedule does not exist on the Community side.
- Members figure out the meeting times manually.
- There are video calls.
The chat function in Communities is connected globally and shared throughout Brella. This means that even when a member is within a Community, they can still access chats and meeting requests from events in the past, present, or future.
For some more information on Networking, check out these articles:
💡Note: We strongly advise against deleting existing matchmaking interests in an active community, as this will alter the matches seen by your attendees. The best way to edit your matchmaking interests is by adding new ones without deleting existing interests. You also can't recover any deleted matchmaking interests or data.
Last updated in August 2023.

Written by Purnima Jayasuriya.
If you didn't find an answer to your questions, please get in touch with the Support Team here.
👇